Most accidents with electricity in the home are caused by faulty or incorrectly wired plugs.
The correct wiring of a plug is extremely important for your safety.
If you are wiring a plug follow these guidelines.
Guidelines on wiring a 3-pin plug
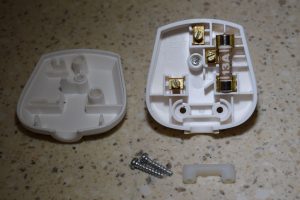
Prepare the plug
Remove the cover and loosen the screws of the cord grip
Loosen the screws from the brass terminals
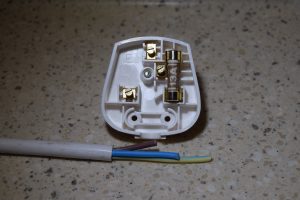
Prepare the flex
Measure the flex against the plug and strip the outer covering back as far as the cord grip.
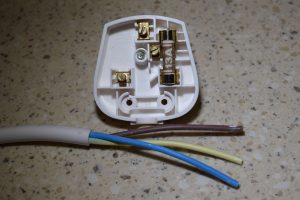
Take care not to cut through the coloured insulation on the wire strands.
Twist the exposed wire strands of each core between the finger and thumb to ensure there are no loose strands.

If the coloured cables have to be trimmed, ensure they are long enough to reach the terminals without straining. Allow for a little slack on the green/yellow earth wire.
Strip about 10 mm (1/2 inch) of the coloured insulation from each core.
Fixing the flex to the plug
Remember the colour code
BROWN to the LIVE (L) terminal

BLUE to the NEUTRAL (N) terminal
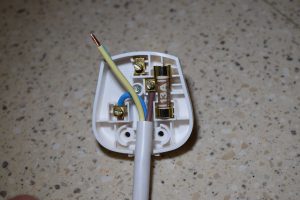
GREEN/YELLOW to the EARTH (E) terminal
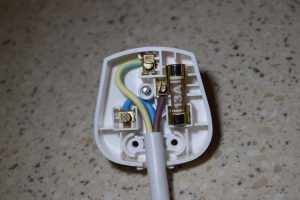
Tighten the cord grip screws, making sure that the cord grip is clamped on the full outer covering of the cable and not on the inner cores.
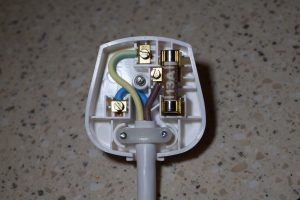
If the plug has clamp terminals, wrap each core around the appropriate terminal. Then place the washer on top of the twisted wire and tighten the screw nuts firmly. Make sure that the coloured insulation is not pinched under the terminal clamp.
Replace the cartridge fuse in 13 Amp plugs with an appropriate sized fuse – a blue 3-Amp fuse for lights and small appliances; a brown 13-Amp fuse for larger appliances and heaters.
Replace the cover.
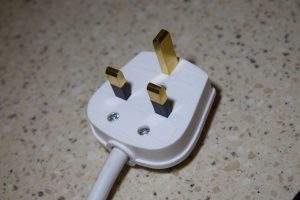
Moulded Plug Top
If the appliance has a moulded plug, it cannot be opened or rewired. If the plug is damaged or faulty, it can be cut off and a new plug fitted.
Appliances with 2-core flexes
The two cores should be connected to the appropriate LIVE and NEUTRAL terminal; the EARTH terminal is not used in this case.
